
A ṣe ideri fun aquarium pẹlu ọwọ ara wa: itọsọna ti o rọrun ati alaye si iṣe
You can easily find a cover for an aquarium in any pet store. But the problem is that it is very difficult to buy a really good one. Many aquarists note a number of inconveniences that they have had to deal with using factory lid models.
Awọn wọnyi ni:
- The lid may simply not fit your aquarium if it is a non-standard size;
- At the factory, only two light bulbs are usually inserted. And this lighting is not enough to create the perfect atmosphere for your pets;
- It is very inconvenient to clean the aquarium and change the water in it, since the factory cover does not open entirely, but in parts;
- Due to the low fit of the cover on the aquarium, the lamps are constantly in the water. And this, firstly, is a terrible condensate. And secondly, the heating elements increase the water temperature by 5-6 degrees.
- It is inconvenient to insert the intake due to too narrow holes for wires and tubes + complete lack of ventilation.
So if your hands grow from where you need to, you can easily make a cover for an aquarium with your own hands. And our guide will help you with this.
Materials required for work
First of all, you need to decide what material is better to use? The best option (in our opinion) is the use of foamed PVC. It costs a penny, weighs almost nothing, but at the same time it is quite tough and is not afraid of the aquatic environment. And it is also very easy to cut with a regular clerical knife.
In addition to PVC, you will need:
- Stationery knife (of course);
- Glue for plastic. You can use any superglue, but keep in mind that it sets very quickly. If you don’t immediately connect the parts exactly, you will have to break the structure;
- Silicone sealant + gun;
- Rubber gloves, pencil, ruler;
- Plastic corners in the amount of 4 pieces;
- Self-adhesive wallpaper or acrylic paint,
As soon as all the materials necessary for work are in front of you, you can proceed to the direct manufacture of the necessary structure.
We make a cover
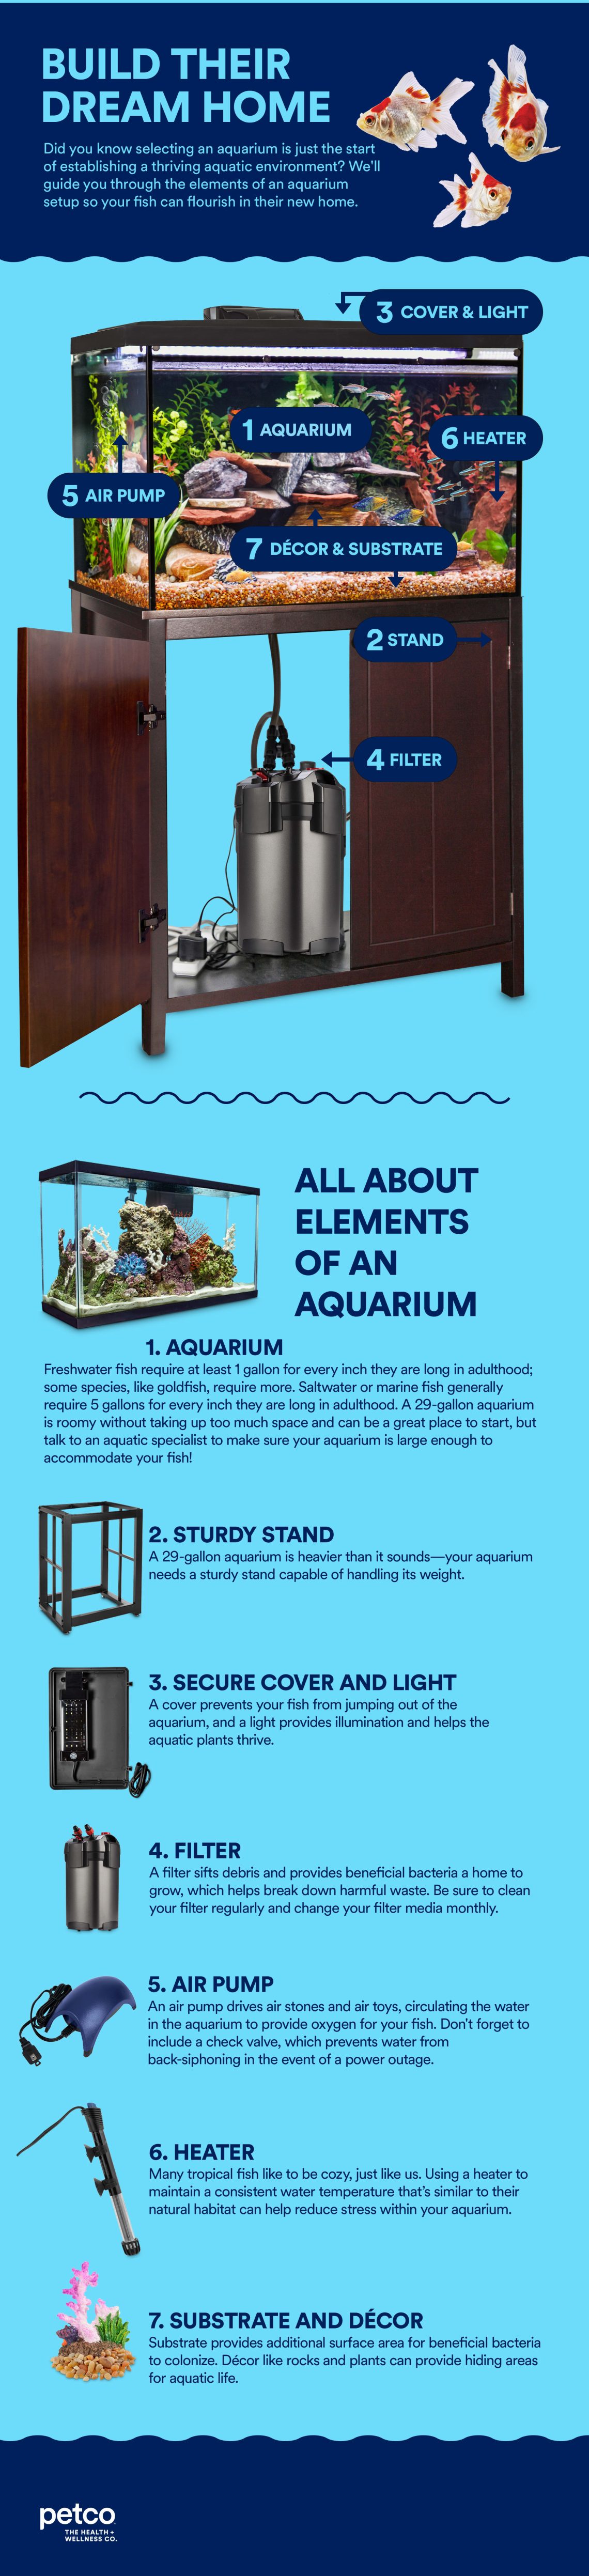
According to our plan, the lid for the aquarium should contain not only all the insides of the lighting built into it, but also the external filtration system. That’s why the height of the box to be glued should be chosen so that everything you need can be easily hidden in it. Well, the length and width of the cover should correspond, of course: the size of the aquarium + a small allowance for the thickness of the PVC used and the gaps.
We make all the necessary measurements and, using a ruler and a pencil, makes markings on a PVC sheet. Then we cut the necessary parts with a clerical knife. It is very easy to do this. Plastic is easy to cut, while it does not break or crumble.
Then glue the side walls to the base of the lid. Be sure to do this in a well-ventilated area. As a result, you should get a smooth and pretty nice box. Then it’s the turn of using plastic corners. Step back 3 cm from the top edge of the cover and the sticker in each inner corner of the structure, one furniture corner. This will be the support for the top of the lid. You can make more additional stiffeners from a piece of the same plastic.
Carefully turn our design over (base down) and put it on the newspaper. We take silicone sealant and carefully fill all the resulting seams (gluing points). We are waiting for the sealant to dry a little. And we move on.
We make 1-2 slots for the necessary hoses and wires, and also cut out a hatch for falling asleep food (and other needs). Choose the size of the hatch and you can leave it open. But if there is a desire, make a lid from the piece of plastic that was left after cutting out the hole for the hatch. To do this, it is necessary to cut out 4 stiffening ribs of about 1,5 * 4 cm in size from a piece of PVC. They must be glued on each side of the hatch so that they protrude neatly. Then the manhole cover will easily fall on them.
Paste the structure from the inside with foil, and paint the outside with acrylic paint. Or cover with wallpaper. Actually, the lid itself is ready.
We make the backlight
So, we completed the first part of our plan: we made a lid for the aquarium with our own hands. Now you need to build lighting fixtures into it. To implement our plans, we need 2 LED and 2 energy-saving + 2 cartridges for them. This number of lamps is ideal for lighting an aquarium of 140 liters (approximately).
We carefully connect the wires of the lamps to each other and carefully isolate the whole thing. Be sure to glue a piece of plastic to the energy-saving cartridges. This is done so that the lamps do not touch the base of the aquarium lid. And be sure to remember that Lamps must not touch water.. To avoid this, carefully take the measurements mentioned above. And glue the stiffeners on which the cover will lie at the correct height.
Do not forget at each stage to carefully degrease everything, try on and only then glue.
We leave our product for the night in we ventilate the room. In the morning we try on and enjoy the creation of our hands. Of course, if you did everything right.


O le tun fẹ
Wa ọjọ-ori ti budgerigar: awọn ami ita ti parrot ọdọ kan
Top 10 tobi cockroaches ni aye